
Adding New Users with a PIN ID
To add a new user, select the icon that says Add New User at the top of the screen. From there, the user will be prompted to enter a new PIN for the new user.

After choosing a PIN, the following screen will appear:
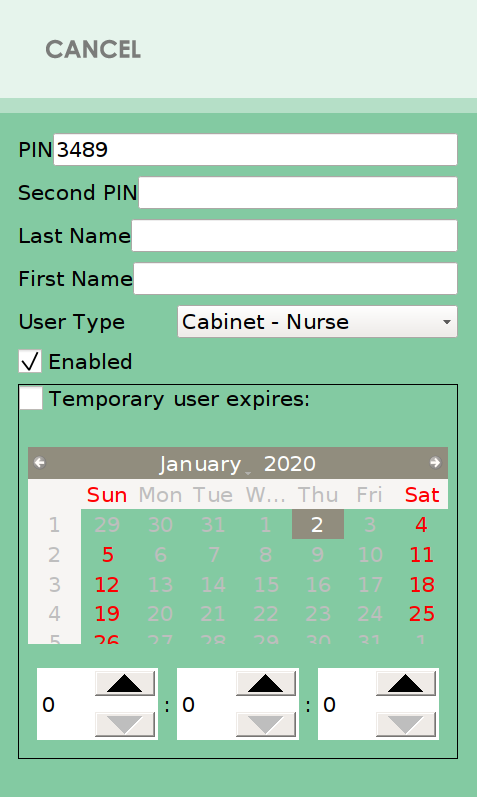
In this menu, the user will be able to change the original PIN that they set, create a secondary PIN for the new user, enter the new user’s first and last names, choose the type of new user, choose if that user is Enabled or Disabled (see Managing Current Users), and choose if the new user will be able to use the cabinet indefinitely or just temporarily (see Temporary Users).
To change the original PIN, choose a secondary PIN, or enter the new user’s first and last names, the user can select the desired field by selecting the corresponding blank. From there, a keyboard will appear allowing the user to enter the desired information. Once the information is entered, select the save icon at the top of the screen. This will return the user to the previous screen and update the information entered. These steps should be repeated for all of the required fields. To change the User type, the drop down menu can be selected. This will provide the user with a list of options which include:
- Cabinet – Admin
- Cabinet – Assistant
- Cabinet – IT
- Cabinet – Manager
- Cabinet – Nurse
- Cabinet – Pharmacy
- Company Administrator
The desired category should be selected, and the field will update as the drop down menu condenses. This field determines the privileges of that specific user when using the system (See Below).
Adding New Users with a Badge ID
The process of adding a new user with a badge ID differs slightly from adding a new user with a PIN. The first thing that should be checked is that there is an RFID card reader installed on the cabinet.
Once this is confirmed, proceed to add a new user the same way as before with a PIN idea. Upon doing this, the same screen will appear as before, asking to enter a new PIN
When this screen appears, simply scan the desired badge on the RFID reader. The PIN blank will populate and the same screen that appears after entering a primary will appear. Proceed in the same manner as before to finish adding the user.
User Privileges
The following table summarizes the privileges for each type of user:
| User Type | Access Med Bins | Access Supplies | Unlock Cassette | Modify Users | Modify Settings | Access to cloud portal |
|---|---|---|---|---|---|---|
| Company Admin | Yes | Yes | Yes | Yes | Yes | Yes |
| Cabinet Admin | Yes | Yes | Yes | Yes | Yes | No |
| Manager | Yes | Yes | Yes | Yes** | No | No |
| Nurse | Yes | Yes | Yes | No | No | No |
| Pharmacy | Yes | Yes | Yes | No | No | No |
| Assistant | No | Yes | No | No | No | No |
| IT | No | No | No | No | Yes | No |
Post your comment on this topic.